How To Use SSH IoT From Anywhere On Ubuntu And Windows For Free
Hey there tech enthusiasts! Are you ready to dive into the world of SSH IoT? In this digital era, remote access is not just a luxury—it's a necessity. Whether you're a developer, a hobbyist, or someone who wants to control their smart devices from anywhere, SSH IoT can be your ultimate solution. Imagine being able to connect to your Ubuntu or Windows machine from any corner of the globe without breaking the bank. Sounds cool, right? Well, let's get started and figure out how to use SSH IoT from anywhere on Ubuntu and Windows for free.
Now, before we dive deeper, let’s clarify what SSH IoT really means. SSH, or Secure Shell, is a cryptographic network protocol that allows secure communication between two devices over an unsecured network. When we talk about IoT (Internet of Things), we’re referring to the network of physical devices embedded with sensors, software, and connectivity to exchange data. Combining SSH with IoT opens up a world of possibilities for remote management and automation. This guide will walk you through everything you need to know to set it up for free.
So, why should you care? Because having the ability to remotely access your IoT devices can save you time, money, and headaches. Whether you’re troubleshooting a device, monitoring its performance, or simply updating its software, SSH IoT makes it all possible. Let’s break it down step by step and make sure you’re equipped with the knowledge to get started today!
Read also:Mastering Remoteiot Web Ssh Raspberry Pi Your Ultimate Guide
Why SSH IoT Is Important for Remote Access
First things first, SSH IoT isn’t just another buzzword in the tech world. It’s a game-changer for anyone who deals with IoT devices. Think about it—IoT devices are everywhere these days, from smart home appliances to industrial sensors. But what happens when you need to manage or troubleshoot these devices remotely? That’s where SSH comes in.
SSH IoT provides a secure and encrypted way to communicate with your devices, ensuring that your data stays safe from prying eyes. Unlike other protocols, SSH uses encryption to protect your communication, which means hackers will have a tough time intercepting your data. Plus, it’s super versatile, working seamlessly on both Ubuntu and Windows platforms. So, whether you’re a Linux fan or a Windows lover, SSH IoT has got you covered.
Understanding SSH and Its Role in IoT
Now, let’s talk about SSH in more detail. SSH is like the Swiss Army knife of remote access tools. It allows you to connect to a remote server or device securely, execute commands, and even transfer files. When it comes to IoT, SSH is especially useful because it lets you manage your devices without being physically present.
Here’s a quick rundown of what SSH brings to the table:
- Secure communication through encryption
- Remote command execution
- File transfer capabilities
- Support for multiple authentication methods, including passwords and keys
For IoT devices, SSH acts as a bridge between you and your devices, enabling you to monitor, manage, and maintain them effortlessly. And the best part? It’s free! You don’t need to invest in expensive software or hardware to get started. All you need is a device running Ubuntu or Windows and an internet connection.
Setting Up SSH on Ubuntu
Alright, let’s get our hands dirty and set up SSH on Ubuntu. This part is super easy, and I promise you won’t need a degree in computer science to follow along. First, you’ll need to install the OpenSSH server on your Ubuntu machine. Don’t worry, it’s just a few commands away.
Read also:The Unforgettable Journey Of Nikki Sixx From Motley Crue To Hollywood
Step 1: Open up your terminal and type the following command to update your system:
sudo apt update
Step 2: Once your system is up to date, install the OpenSSH server using this command:
sudo apt install openssh-server
Step 3: After the installation is complete, check if the SSH service is running by typing:
sudo service ssh status
If everything went smoothly, you should see a message saying that the SSH service is active and running. Congrats, you’ve just set up SSH on your Ubuntu machine! Now, let’s move on to the next step.
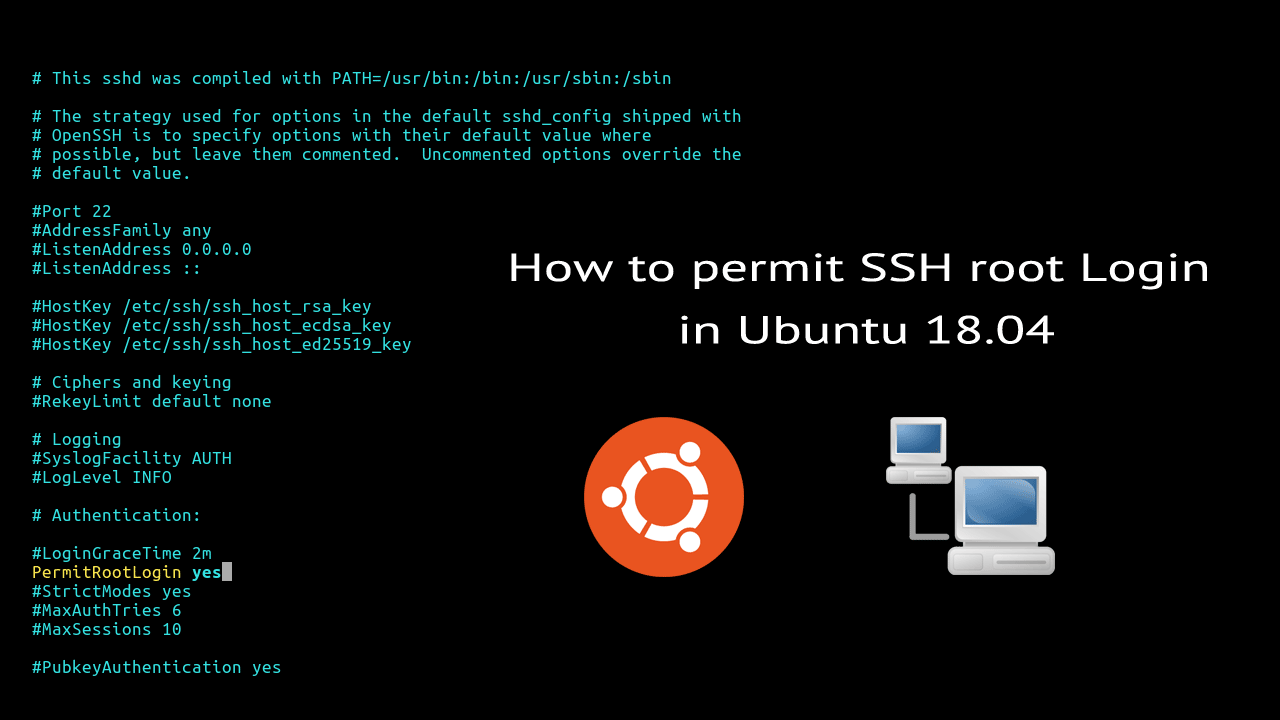
Configuring SSH for IoT Devices
Configuring SSH for IoT devices is where the magic happens. Once you’ve installed the OpenSSH server, you’ll need to tweak a few settings to make sure it works seamlessly with your IoT devices. Here’s how you can do it:
Step 1: Open the SSH configuration file using this command:
sudo nano /etc/ssh/sshd_config
Step 2: Look for the following lines and make sure they’re uncommented:
- Port 22
- PermitRootLogin no
- PasswordAuthentication yes
Step 3: Save the file and restart the SSH service using this command:
sudo service ssh restart
That’s it! Your Ubuntu machine is now ready to communicate with your IoT devices over SSH.
Setting Up SSH on Windows
Now, let’s switch gears and talk about setting up SSH on Windows. Believe it or not, Windows has come a long way in terms of supporting SSH. With the latest versions of Windows 10 and 11, you can easily enable SSH without installing any third-party software.
Step 1: Open the Start menu and search for "Turn Windows features on or off."
Step 2: Scroll down until you find "OpenSSH Server" and check the box next to it.
Step 3: Click OK and restart your computer if prompted.
Once your computer restarts, SSH should be up and running. To confirm, open a command prompt and type:
ssh -V
If you see the version number of the SSH client, you’re good to go!
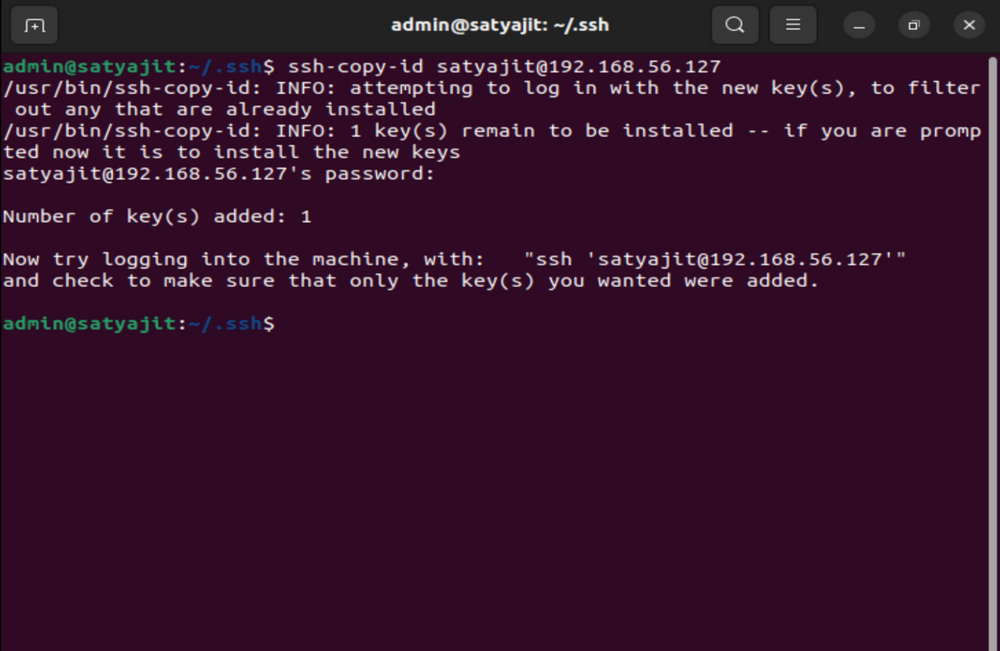
Connecting to IoT Devices from Windows
Connecting to your IoT devices from Windows is just as easy as setting up SSH. Here’s how you can do it:
Step 1: Open the command prompt and type the following command:
ssh username@ip_address
Step 2: When prompted, enter your password to establish the connection.
Step 3: Once connected, you can start executing commands or transferring files as needed.
Simple, right? With SSH, managing your IoT devices from Windows is a breeze.
Using SSH IoT from Anywhere
So, you’ve set up SSH on both Ubuntu and Windows, but how do you use it from anywhere? That’s where port forwarding and dynamic DNS come into play. These tools allow you to access your devices from outside your local network, even if you’re miles away.
Port Forwarding: Port forwarding is the process of mapping an external port on your router to an internal port on your device. This allows you to connect to your device from the internet. To set up port forwarding, log in to your router’s admin interface and create a rule that forwards port 22 (the default SSH port) to the IP address of your device.
Dynamic DNS: Dynamic DNS (DDNS) is a service that keeps track of your changing IP address and assigns a domain name to it. This way, you can connect to your device using a domain name instead of an IP address. There are several free DDNS services available, such as No-IP and DuckDNS.
Security Tips for Remote Access
While SSH is a secure protocol, it’s always a good idea to take extra precautions when accessing your devices remotely. Here are a few tips to keep your setup secure:
- Use strong passwords and consider enabling two-factor authentication.
- Change the default SSH port to something less obvious.
- Limit access to specific IP addresses if possible.
- Regularly update your devices and software to patch any vulnerabilities.
By following these tips, you can enjoy the benefits of remote access without compromising your security.
Advanced Features of SSH IoT
SSH IoT isn’t just about remote access—it offers a host of advanced features that can make your life easier. Let’s explore some of them:
Tunneling and Port Forwarding
SSH tunneling allows you to securely transfer data between two devices over an unsecured network. This is especially useful for accessing sensitive information or transferring large files. To create an SSH tunnel, use the following command:
ssh -L local_port:destination:destination_port username@remote_host
This command forwards traffic from your local machine to the remote machine, creating a secure tunnel for your data.
File Transfer with SCP
SCP (Secure Copy Protocol) is a built-in feature of SSH that allows you to transfer files between your local machine and a remote server. Here’s how you can use it:
- To copy a file from your local machine to the remote server:
- To copy a file from the remote server to your local machine:
scp /path/to/local/file username@remote_host:/path/to/remote/file
scp username@remote_host:/path/to/remote/file /path/to/local/file
SCP is a fast and secure way to transfer files, making it a valuable tool for managing your IoT devices.
Troubleshooting Common SSH IoT Issues
Even with the best setup, things can sometimes go wrong. Here are a few common SSH IoT issues and how to fix them:
Connection Refused
If you’re getting a "connection refused" error, it could mean that the SSH service isn’t running or the port is blocked. Check the status of the SSH service and make sure port 22 is open on your router.
Authentication Failed
This error usually occurs when you enter the wrong password or username. Double-check your credentials and try again. If you’re still having trouble, consider resetting your password or generating a new SSH key.
Timeout Errors
Timeout errors can be caused by network issues or firewalls blocking your connection. Make sure your firewall settings allow traffic on port 22 and check your internet connection.
Conclusion
And there you have it, folks! You now know how to use SSH IoT from anywhere on Ubuntu and Windows for free. Whether you’re managing smart home devices, monitoring industrial sensors, or simply accessing your files remotely, SSH IoT has got you covered. Remember to follow best practices for security and take advantage of the advanced features SSH offers.
So, what are you waiting for? Get out there and start experimenting with SSH IoT. And don’t forget to share your experiences in the comments below. Who knows, you might just inspire someone else to take the leap into the world of remote access!
Daftar Isi:
- Why SSH IoT Is Important for Remote Access
- Understanding SSH and Its Role in IoT
- Setting Up SSH on Ubuntu
- Configuring SSH for IoT Devices
- Setting Up SSH on Windows
- Connecting to IoT Devices from Windows
- Using SSH IoT from Anywhere
- Security Tips for Remote Access
- Advanced Features of SSH IoT
- Tunneling and Port Forwarding
- File Transfer with SCP
- Troubleshooting Common SSH IoT Issues

